Depositing data through Aila
1. Service description
Depositing data at the Finnish Social Science Data Archive for reuse is easy and secure through Aila Data Service. The depositing process includes the following steps:
- The data depositor contacts FSD
- An archiving agreement is made prior to the deposit
- The depositor receives a link to activate the deposit on Aila
- The depositor adds the necessary information to the deposit and completes the deposit
- FSD processes the completed deposit in accordance with our archiving practices
- The dataset is published on Aila
Depositing a dataset requires that depositing is agreed upon with the Archive. FSD will start the depositing process for the user. Depositing a dataset through Aila requires registering as a user of the service. The deposit interface on Aila is currently only available in Finnish, but this page contains instructions on how to carry out a deposit with the service.
Files and information transferred through Aila are stored in the service only for as long as it takes for the archiving process to finish. After this, the data are erased. After the archiving process is finished, the archived version of the dataset is published on Aila.
2. How to deposit a dataset through Aila
Read the below instructions carefully. When using Aila, also follow instructions for specific pages and form fields. If you cannot find the guidance that you need, you can always contact FSD User Services.
Starting the depositing process: activation link and logging in
The depositing process begins when you receive an activation link from FSD in your email. The link will direct you to a login page and a form where you can fill in information regarding the deposit. The activation link is functional only once. After this, you can log in for the deposit on Aila with a Haka federation username or a username issued by FSD (for those not studying or working at a university, polytechnic or research institution in Finland). You can view your active deposits via the link Browse your data deposits (in Finnish) on your Aila profile page. This link will direct you to the Aila page Omat luovutukset (My deposits), where you can see all your active deposits. Deposits are not visible on Aila until you have activated them with the activation link sent to your email address.
You can add or edit information regarding the deposit in Omat luovutukset (My deposits) by choosing a deposit in Luonnos (Draft) status (see Figure 1 below) and following the instructions in the next section.
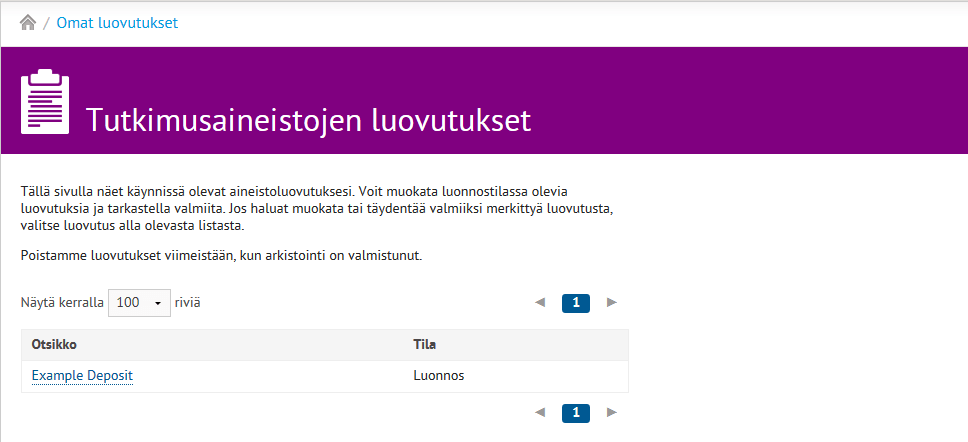 Figure 1: User view of Omat luovutukset (My deposits).
Filling in the deposit information
 Figure 2: User view of a deposit’s "History" page.
You can add or edit information regarding the deposit and clicking Muokkaa (Edit) (see Figure 2 above). You can edit the deposit until you change its status to Valmis (Finished).
Information needed for the deposit includes basic information, data collection information and files attached for the deposit. You can preview the information you have entered before submitting the deposit. You can move from one tab to another with the buttons at the bottom of the page or by clicking the tab headers. Any changes made to the forms will be saved when moving from one tab to another, but information has to be saved before closing the deposit tool. Below are instructions for filling in the deposit information step by step.
I. Basic information
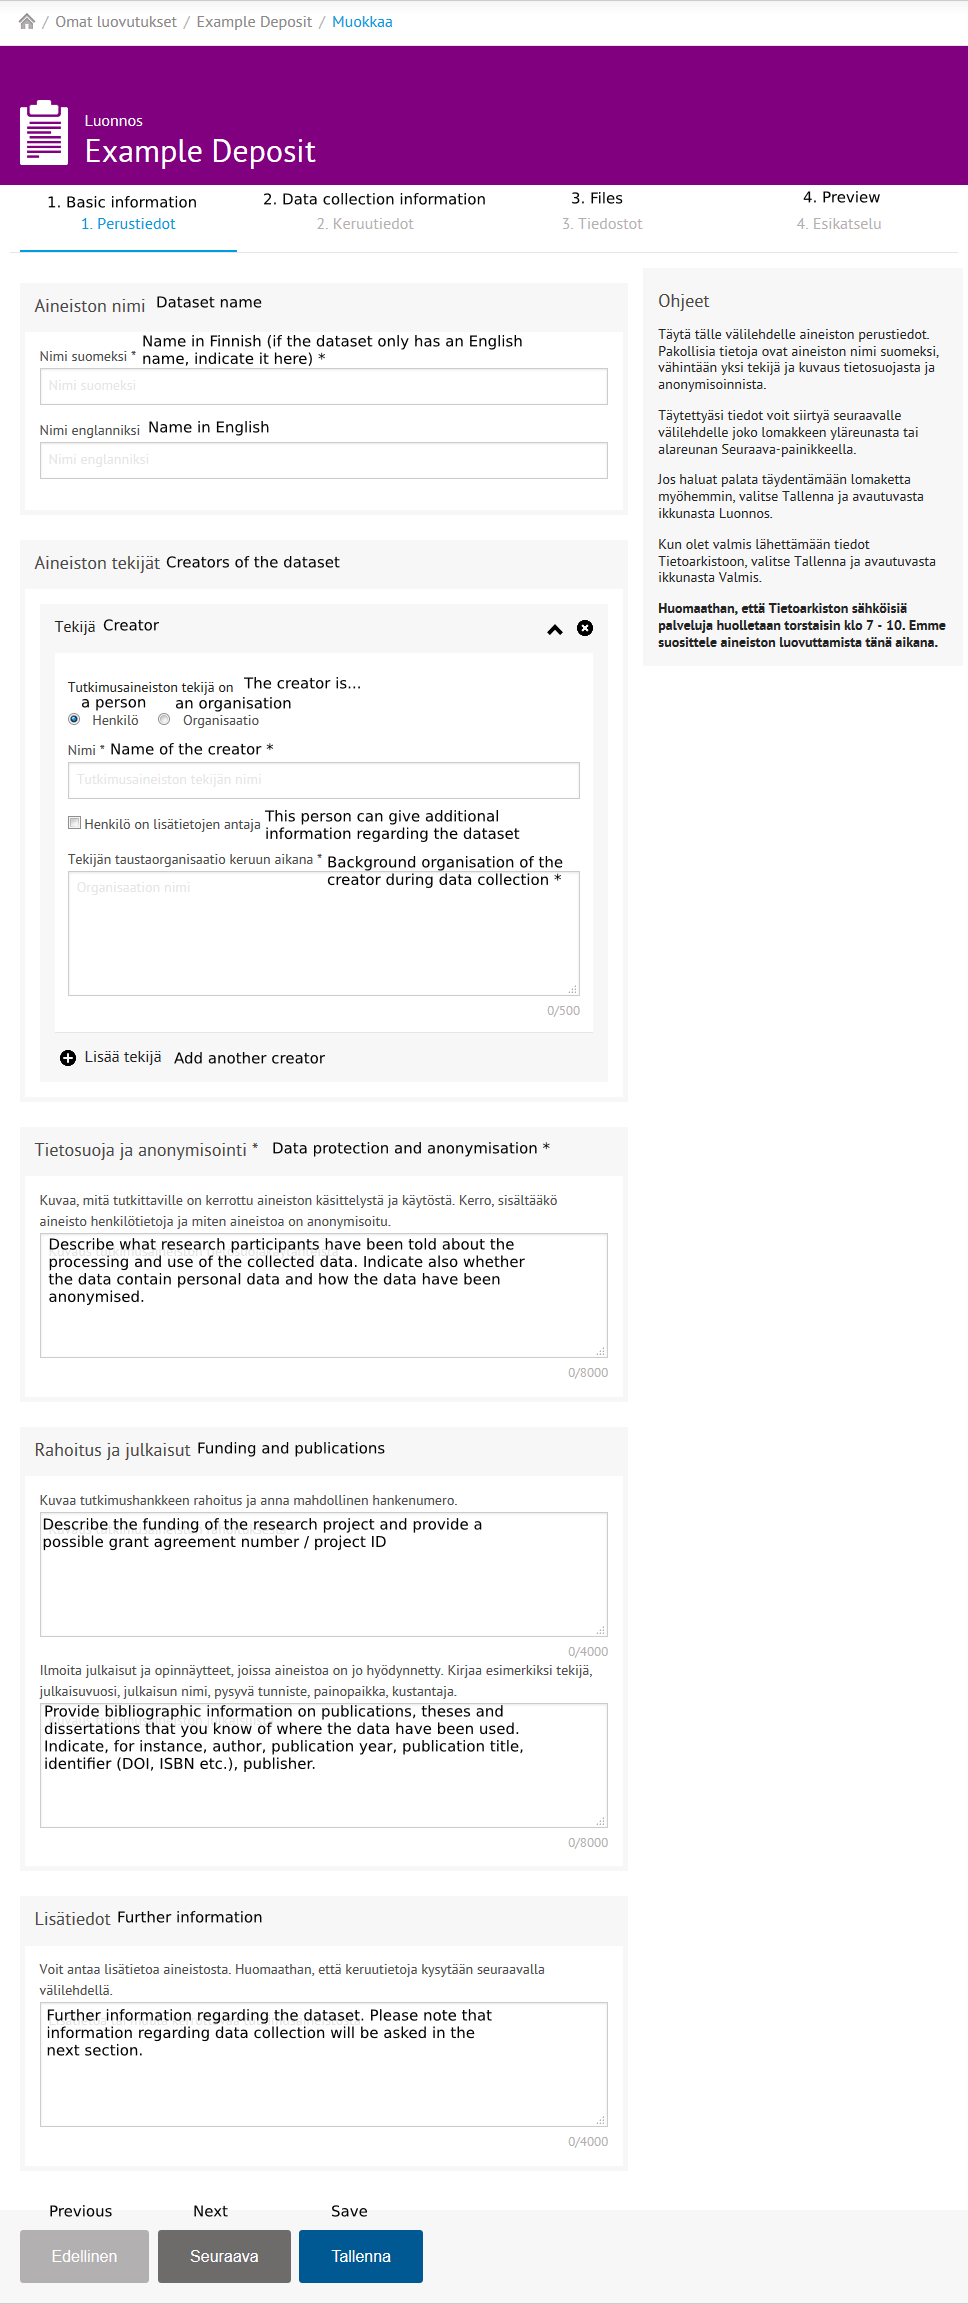 Figure 3: User view of the "Basic information" tab.
On the Perustiedot (Basic information) tab (see Figure 3 above), fill out a suggestion for the name of the dataset in Finnish and in English, creators of the data, information concerning data protection and anonymisation, funding (Rahoitus), and publications using the data (Julkaisut). Required fields are Tutkimusaineiston nimi suomeksi (Dataset name in Finnish – If you only have an English name for your dataset, you can indicate it here), Tekijä (Creator), and Tietosuoja ja anonymisointi (Description of data protection and anonymisation). More than one creator can be added if needed by choosing Lisää tekijä (Add another creator).
The Lisätietoa tutkimusaineistosta (More information) field allows you to add other relevant information regarding the dataset. Please note that information regarding data collection is filled out in the next section.
II. Data collection information
 Figure 4: User view of the "Data collection information" tab.
On the Keruutiedot (Data collection information) tab, fill in data collectors, data collection period, collection methods, sampling procedures as well as data collection instrument or instructions. The fields Keruumenetelmät (Data collection methods), Keruuväline ja -ohje (Data collection instrument or instructions), Otantamenetelmät (Sampling procedure) include vocabularies from which you can choose the suitable terms. Unfortunately, the FSD vocabularies are currently only available in Finnish, but the English vocabularies are available on the website of the DDI Alliance for collection methods, collection instruments and sampling procedures. You can leave the vocabulary field blank and indicate the English vocabulary terms in the larger text area. Please also describe the method or instrument in more depth in the text areas. E.g. with regard to a stratified sampling, it is good to describe in more depth which factors were accounted for in the stratification.
Lastly on the Data collection information tab is a Further information regarding data collection (Lisätietoja keruusta) field where you can add other relevant information about data collection for which no other field is available. E.g. if the data has been collected in several separate periods, you can describe it here.
III. Files
 Figure 5: User view of the "Files" tab.
Compressing data files into a ZIP archive
A ZIP archive (*.zip) can contain multiple files. File folders cannot be added to the deposit, but files and folder structures can be compressed into one ZIP file and thus transferred at one go.
On Windows, compressing files into a ZIP archive is done the following way: Choose a folder or multiple files and click the secondary mouse button. Choose Send to and Compressed (zipped) folder. The ZIP file is created in the same location and named after the compressed file or folder. You can add new files to the ZIP archive by dragging and dropping. Other operating systems have their own procedures for creating ZIP archives. You can also use a third-party application (e.g. WinZip, 7-zip, iZip) for creating ZIP archives.
The Tiedostot (Files) tab allows you to add the files for your deposit. The deposit requires at least one file, but in many cases there are more files to be deposited. Name the files logically before transferring them to the deposit tool.
Folders cannot be transferred to the deposit tool, but transferring multiple files at once works simply by dragging the desired files to the drop zone on the right-hand side of the page or by selecting the files via the Valitse tiedostoja (Choose files) menu. You can download the files that you have transferred to the deposit tool.
If the dataset comprises multiple data files, you can compress them into a ZIP archive and transfer the ZIP file instead of separate data files. If there are more than 50 files, compression is necessary to ensure a successful transfer. You cannot transfer an uncompressed folder, only files. The maximum file size is one gigabyte for an individual file and three gigabytes for the deposit in total. Contact User Services in the case that your dataset is larger than this.
If you have any challenges in transferring the files, please check that you are using a supported browser (see section 4. Information about data protection and browsers).
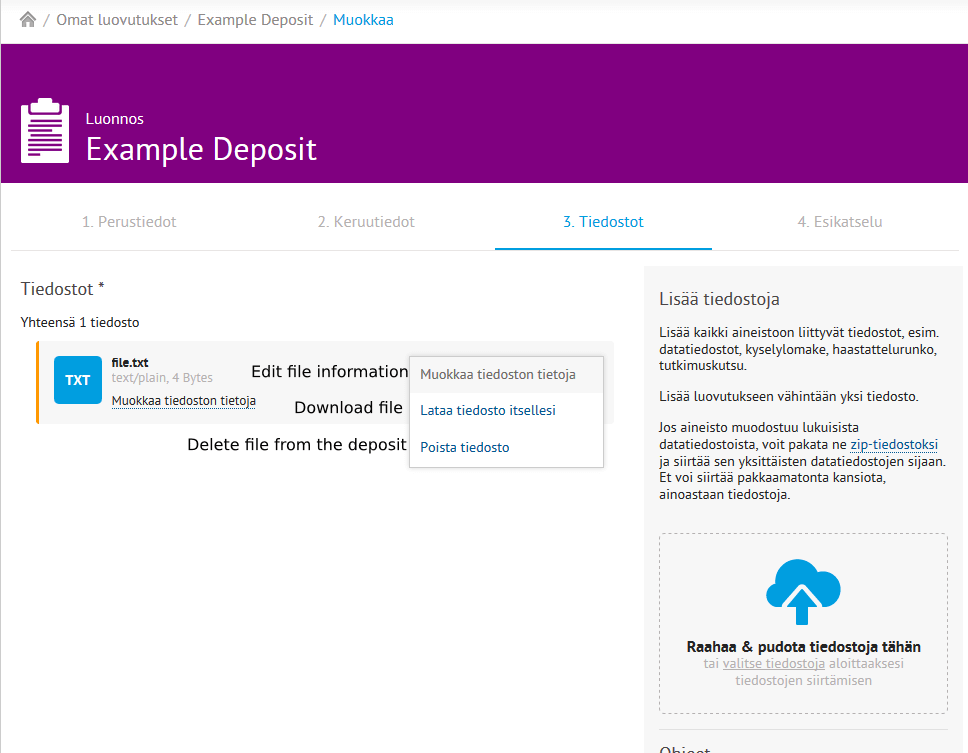 Figure 6: View of a file transferred to the deposit.
The files transferred to the deposit tool appear on the left-hand side of the interface (see Figure 6 above). By clicking Muokkaa tiedoston tietoja (Edit file information), you can describe contents of the files in more detail (see Figure 7 below). Fill out the information inasmuch it is relevant for the files you are transferring. E.g. in the field Kieli (Language), you can add more information if the contents of the files are in some other language than in Finnish. You can also describe in more detail the contents of the files, number of cases and weight variables used.
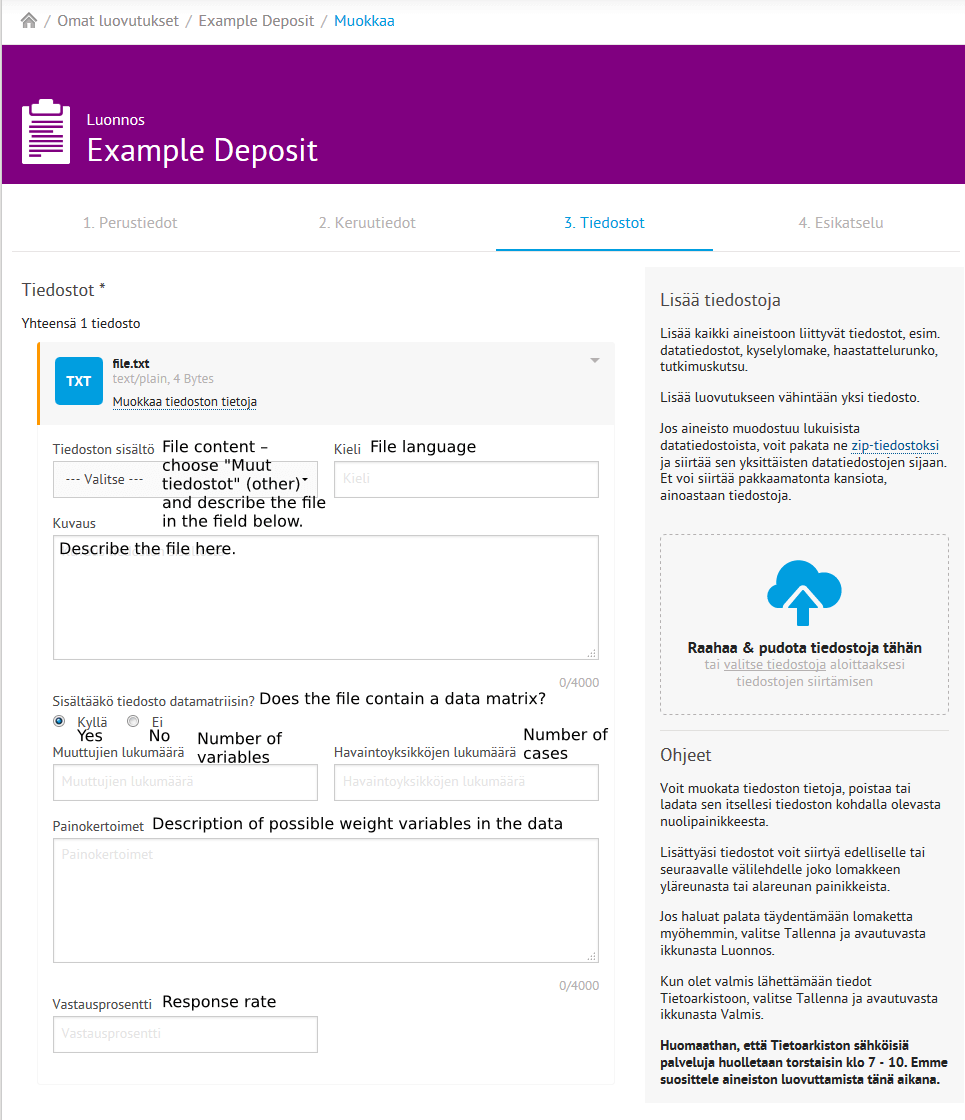 Figure 7: File information view.
Please note that the deposit information and materials are erased from the deposit tool when the deposit and archiving processes are finished.
IV. Preview
The Esikatselu (Preview) tab allows you to see the deposit information in full, and you can use it to check the information you have filled out or to download the transferred documents for yourself. Downloading the files can be done by clicking on the file name. If you wish to edit the information, move on to other tabs from the top of the form or the buttons on the bottom. When you are ready to send the information to FSD, choose Tallenna (Save) and Valmis (Finished) (see Figure 8 below).
Saving as a draft and as finished
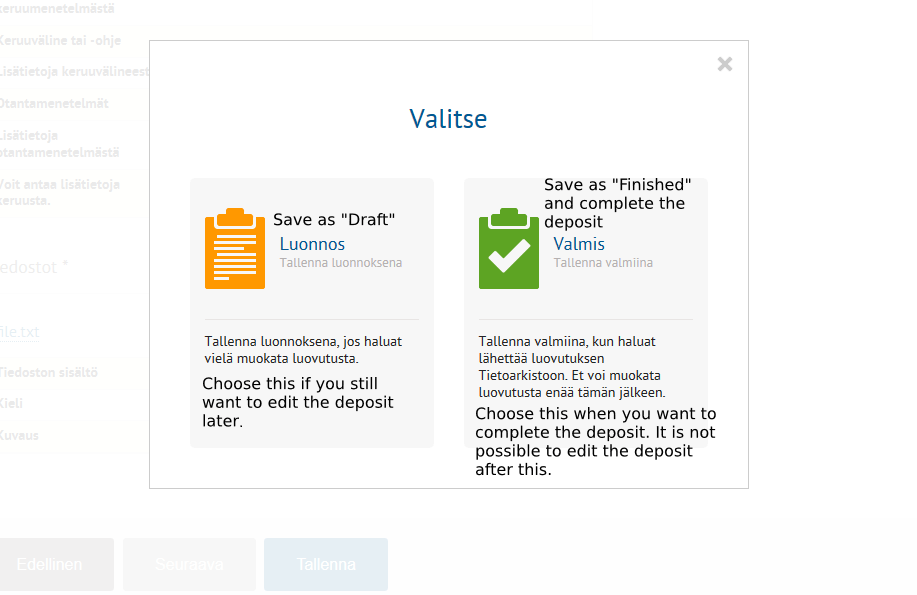 Figure 8: Saving the deposit.
You can save the deposit in editing mode while viewing any tab. Clicking Tallenna (Save) at the bottom of a page opens a pop-up window where you can choose to save the deposit either as Luonnos (Draft) or Valmis (Finished) (see Figure 8 above). Saving as Luonnos (Draft) saves your unfinished deposit as a draft so that you can still edit it. If your deposit is ready to be sent to FSD, choose Valmis (Finished). After this, there is no possibility of editing the deposit. The deposit tool will ask your confirmation when completing the deposit (see Figure 9 below).
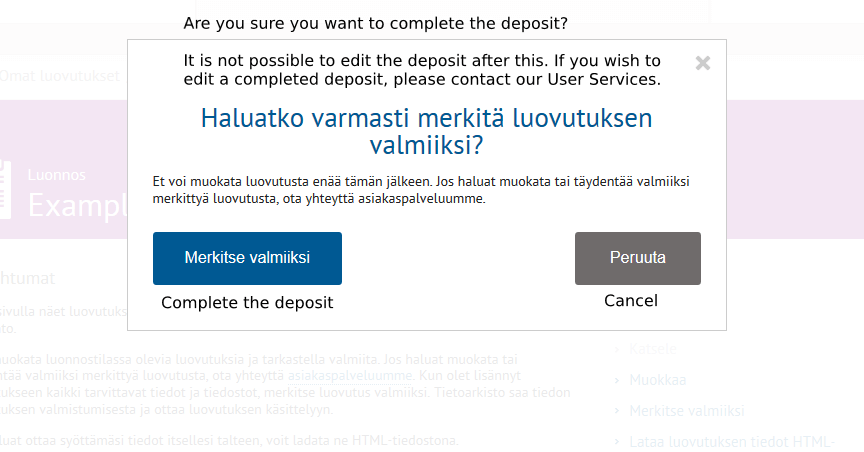 Figure 9: Confirmation window for completing a deposit.
You can also mark the deposit as "Finished" on the Tapahtumahistoria (History) page by clicking Merkitse valmiiksi (Change status to "Finished"). If all required fields are not filled in, the system will redirect you to the editing page.
If you wish to edit a deposit that has already been marked as Valmis (Finished), send a message to FSD User Services through the History page and ask us to mark the deposit as Luonnos (Draft) again (see section 3. Sending messages and message history).
Deposit status
On the Omat luovutukset (My deposits) page, you can see all your Aila deposits and their statuses. Deposit statuses depend on what changes have been made. In addition, you can view the history for a deposit where you can see changes in the deposit status. The different statuses are described here.
Uusi (New)
The deposit has been created and its status is Uusi (New) until you activate the deposit with the activation link that you have received from FSD.
Luonnos (Draft)
When the deposit is in Luonnos (Draft) status, you can fill in the forms, edit the deposit information and transfer files for the deposit.
Valmis (Finished)
The deposit status changes to Valmis (Finished) when you have saved the deposit and marked it as finished. A finished deposit cannot be edited because it is already being processed. You can contact the User Services if it is still necessary to edit the deposit (see section 3. Sending messages and message history).
Downloading the deposit information
The deposit will be erased from Aila when the archiving process is finished. If you wish to save the information you have entered for the deposit, you can download it as an HTML file via the link Lataa luovutuksen tiedot HTML-tiedostona (Download deposit information in HTML). Open the file in a web browser to view its contents. It is also possible to print the information by using the browser’s printing function.
3. Sending messages and message history
You can send messages directly to User Services on Aila. It is recommended that you use this functionality for communicating with FSD regarding the deposit. This way the messages are saved in connection with the deposit. The messages are connected to an individual deposit, so reading and sending messages is done from the Tapahtumat (History) page of an individual deposit (see Figure 2). Choosing Lähetä viesti asiakaspalvelulle (Send a message to User Services) or Tarkastele viestihistoriaa (View message history) takes you to the Viestit (Messages) page of the deposit.
When the User Services send a message to the depositor through Aila, the message is sent to the depositor’s email address in addition to the message service.
The message history regarding a deposit is saved in FSD’s database even though it is erased from the deposit tool when the archiving process is finished.
Sending messages
You can send messages through the Tapahtumat (History) page of an individual deposit by choosing Lähetä viesti asiakaspalvelulle (Send a message to User Services) (see Figure 2). Messages are saved in the chosen deposit’s message history, and the sent messages indicate which deposit they regard.
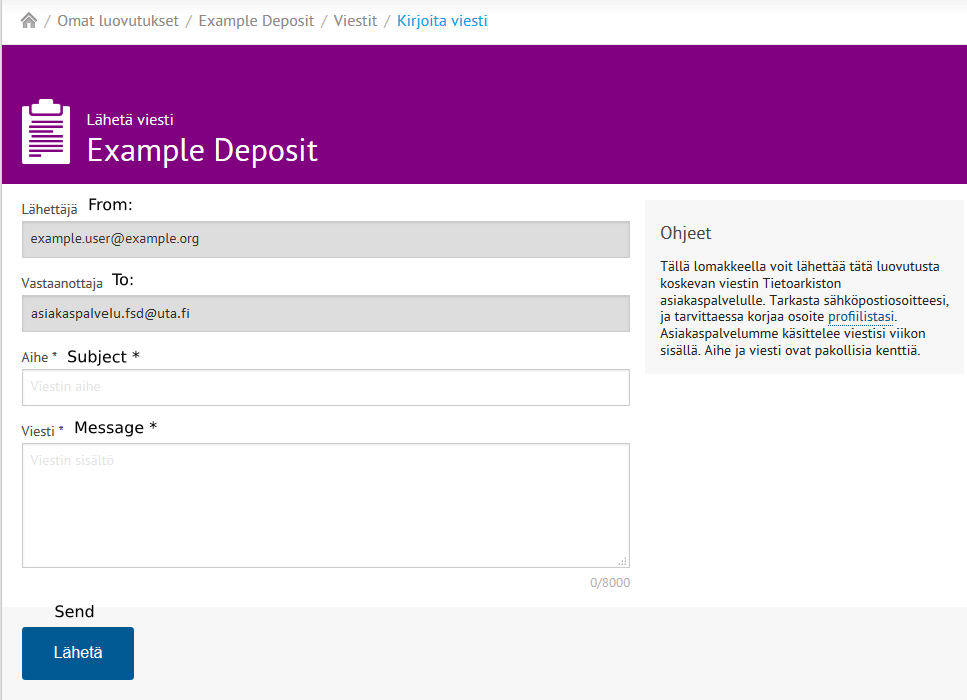 Figure 10: Sending a message to User Services.
When sending a message, remember to check that the email address in the Lähettäjä (From) field is correct. If you notice any errors in the address, edit your contact details in your Aila profile through the "Profile" link on the upper-right corner of the web page.
You can send messages when the deposit status is either Uusi (New), Luonnos (Draft) or Valmis (Finished).
Reading messages
You can view the deposit’s message history and read messages through the Tapahtumat (History) page of an individual deposit by choosing Tarkastele viestihistoriaa (View message history) (see Figure 2).
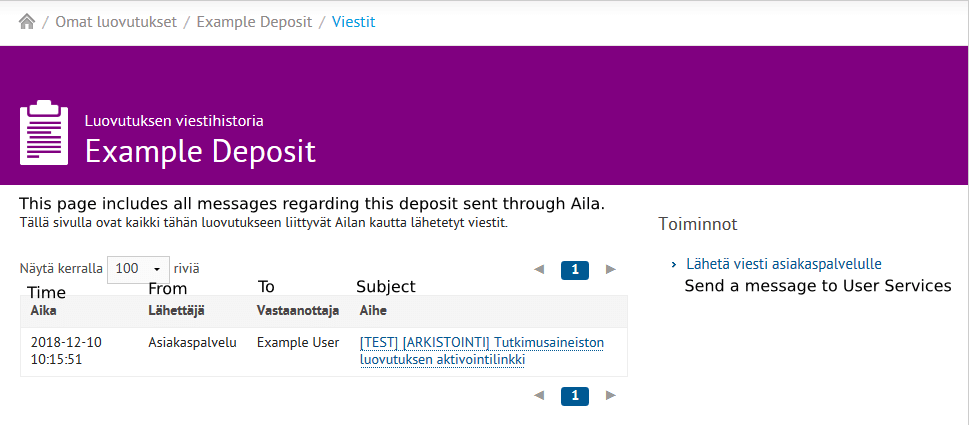 Figure 11: User view of the "Message history" page.
Please note that the deposit message history will be removed from Aila when the archiving process is finished and the deposit information is erased.
4. Information about data protection and browsers
If you use a shared computer (e.g. in a library) and wish to ensure that other users will not be able to access your information, empty the browser’s history and cache when you are done with the deposit tool. If you copied the activation link to the computer’s clipboard on a shared computer, it is a good idea to erase it. This can be done by e.g. copying some other text to the clipboard. In some cases, pressing the Print Screen key overwrites the information on the clipboard.
Online identifiers provided by your computer will be saved in FSD’s systems temporarily. This information is automatically deleted. Information and materials with regard to the deposit are protected in accordance with FSD’s normal data security practices.
Aila supports the following browsers:
- Chrome
- Firefox
- IE 9 and newer
- Opera
- Safari
5. Contact
Should you have any questions concerning depositing or the user interface, primarily contact FSD User Services through the messaging function on Aila (see 3. Sending messages and message history). You may also contact FSD User Services:
email user-services.fsd at tuni.fi
tel. +358 29 452 0411
6. Troubleshooting
The activation link is not working.
The activation link is functional only once. If you try to log in with the activation link again, the link will not work. If the link is not working on the first time, please contact User Services (user-services.fsd at tuni.fi or tel. +358 29 452 0411).
File transfer failed.
If you receive the notification Siirto epäonnistui (Transfer failed), there are generally three possible reasons. Either you have tried to drag an uncompressed folder into the drop zone, there is a maintenance break in the service or you are not connected to the internet or your internet has disconnected momentarily. You can only transfer files and compressed (ZIP) folders into the service. If the error notification is caused by problems in internet connection, refresh the page and attempt to transfer the files again. Check also that the service is not under maintenance currently. If the error is not caused by any of the above reasons, please contact User Services at user-services.fsd [at] tuni.fi or tel. +358 29 452 0411.
The drop zone for transferring files is not working.
If you have difficulties with using the drop zone for transferring files, please check that you are using a supported browser. Supported browsers include Chrome, Firefox, IE 9 (and newer), Opera, and Safari (partial support).
I cannot find the message I received, or where to send a message to User Services.
Messages are always connected to individual deposits. First, choose the deposit whose messages you wish to view. After this, it is possible to view the message history through the link Tarkastele viestihistoriaa (View message history) on the Tapahtumat (History) page of the deposit. This is also where you can send a message to User Services.
I marked the deposit as finished but I want to add a file or edit the deposit information.
Send a message to User Services by choosing the deposit that you have marked as finished and clicking the link Tarkastele viestihistoriaa (View message history) on the Tapahtumat (History) page. User Services are able to change the status of the deposit back to Luonnos (Draft).
The user interface is not working one way or another.
Contact User Services (user-services.fsd at tuni.fi or tel. +358 29 452 0411). If possible, take a screenshot of the problematic situation.